This guide outlines how to create a report in Xero that displays all open (unallocated) credit notes, prepayments and overpayments.
Using the Receivable Invoice Detail report for customers and the Payable Invoice Detail report for suppliers, you can filter to show all customer and supplier credits and focus only on unallocated amounts.
Quick Steps
- In the Accounting menu, select Reports.
- For customer credits, click Receivable Invoice Detail. For supplier credits, click Payable Invoice Detail.
- Choose a date range (consider a longer range to include any older open credits from NetSuite).
- Click More, then under Include, select Prepayments.
- In Grouping/Summarising, select Group By and choose a grouping method (e.g., Source to group by credit notes, prepayments and overpayments. Customer will group by customer).
- Under Columns, select Balance and any additional columns you'd like to include.
- Click Filter
- For status, select Approved. then select Status > select checkbox for Approved, then apply the filter.
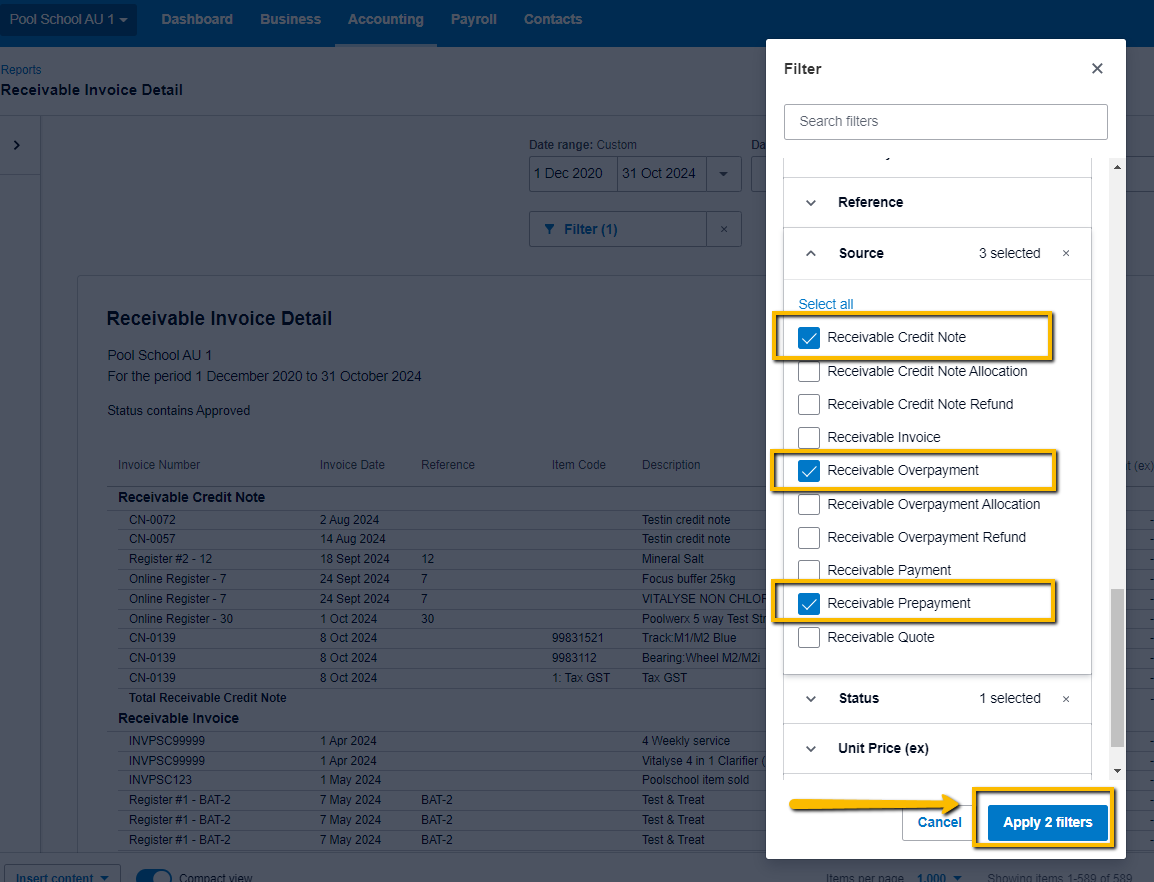
- For Source, select Receivable Credit Note, Receivable Overpayment, and Receivable Prepayment
- Click Apply Filter.
- Click Update to view the report.
TIP
Save as a custom report so you can re-use it in the future
Detailed Instructions
1. Go to the Accounting menu and select Reports.

2. Choose the Appropriate Report
- For customer credits, select Receivable Invoice Detail.
- For supplier credits, click Payable Invoice Detail.

3. Choose a date range (consider a longer range to include any older open credits from NetSuite)

4. Click More and check Prepayments under Include.

5. Under Grouping/Summarising, select Group By and choose a grouping method (e.g., Source to group by credit notes, prepayments, and overpayments).

6. Under Columns, select Balance and any additional columns you’d like to include.

7. Click Filter
- For status, select Approved. then select Status > select checkbox for Approved, then apply the filter.
- For Source, select Receivable Credit Note, Receivable Overpayment, and Receivable Prepayment
- Click Apply Filter.


8. Click Update to view the report.

Save as a Custom Report
To save this configuration for future use:
- At the bottom of your report, click Save As > Custom.
- Name your report and click Save.


Accessing Saved Reports
- Navigate to Accounting > Reports > Custom tab to find saved custom reports.

- Navigate to Accounting > Reports > Custom tab to find saved custom reports.


