This guide outlines the procedure for creating a variant product in LightSpeed, ensuring accurate inventory management and product setup.
Prerequisites:
| Info required: | Product details, supplier details, and pricing information. |
Access required: | LightSpeed system access. |
_____________________________________________________________________________________________
Best Practices
- Ensure all product details are accurately entered into the system to maintain inventory accuracy.
- Regularly review and update product information as needed.
- To achieve the desired naming convention, [Brand] [Product title] / [Sales Channel] / [Size], the first attribute in the variant product must be Sales Channel followed by Size.

- Additional product categories should not be created. If a category does not exist that you require, please email evolution@poolwerx.com.au
_____________________________________________________________________________________________
Procedure:
- Open LightSpeed and navigate to Catalog > Products.
- Click "Add Product".
- Enter Product Information (as a minimum, enter/select the fields below):
- Name: Enter the product name (use the format [Brand] [Product title]).
- Product Category: Select a product category.
- Sell on Point-of-Sale: Check the box to make the product active and available for sales.
- Product Type: Select “Variant Product”.
- Supplier: Select the Supplier if applicable, leaving the Supplier code and price blank.
- Inventory tracking: By default, "Track inventory for this product" is enabled. You can disable it to set the inventory to infinite.
- Variants Section.
- Select an Attribute from the dropdown or use the ‘Search all variant attributes’ box (e.g. Sales Channel).
- In the 'Value' field, type the first value (e.g. Retail) and press Enter. Repeat for additional values.
- To add another attribute (e.g Size), click + Add another attribute and repeat.
- Click 'Add xx values'.

- You'll be prompted to ‘Choose variants to add’ based on the combinations of attribute values. Deselect any combinations that are not required and click 'Save'.

Configuring the Variant Products
- Expand the product by clicking the > arrow next to the Variant name.
- Update the following tabs for each variant:
- Inventory tab: Choose Auto-generated or Custom for SKU code entry.
- Packaging Tab: Set up product relationships if applicable (see Adding Product Relationships).
- Price tab: Enter the retail Price manually (including tax) or set it via margin or markup percentage.
- Image Tab: Upload and select images per variant.
- Click the arrow next to the Variant name to xxx the product.
- Supplier code: Enter the supplier's code for purchases orders if required.
- Supplier Price: Enter the price you pay per unit. It’s recommended to do this before adding inventory to ensure accurate COGS calculations.
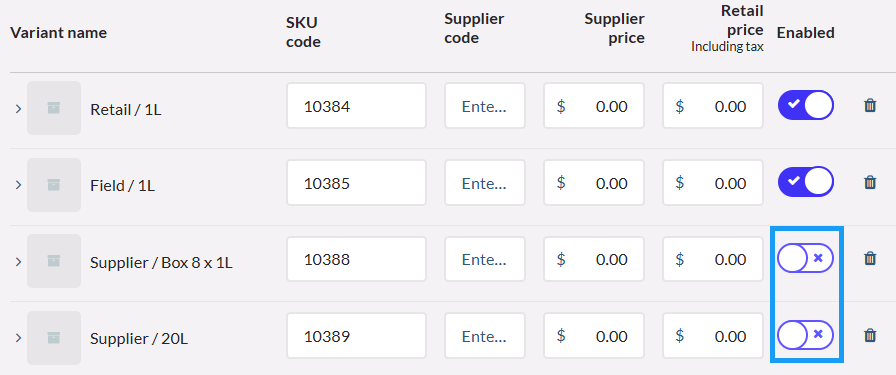
- Enabled: Ensure "enabled" is toggled on, or disable it if necessary.
- Repeat these steps for each variant.
- Click Save.
Note: The products will sync to Vital, typically within 15minutes.
Disabling Variant Notes
The first variant product must be enabled for other variants below it to remain active. If you do not sell certain variants, disable them by unchecking the "Enable" box. If the first value is disabled, it will deactivate the entire product. See the example below for correct disablement of supplier products that aren't 'sold'.

_____________________________________________________________________________________________

